Guidelines for Functional Use of the Pacer Gait Trainer Part II
| October 2019The Pacer gait trainer is a walking device used in pediatric and adult rehabilitation settings to support individuals with disabilities for upright posture and ambulatory activities. Each Pacer component (or prompt) adjusts to accommodate various positioning needs, and is easily removed when it is no longer required.
Because many people use the Pacer without fully appreciating its full functionality, this post describes the key components to lower body positioning and the features of the Pacer casters. See part I for upper body positioning and the features of the Pacer frame.
The Pacer Gait Trainer Options for Pelvic Support and Positioning
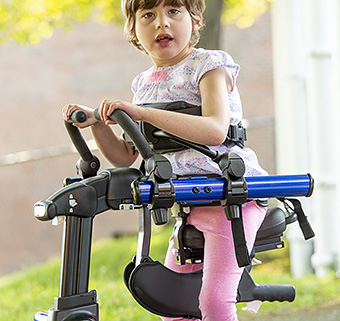
The Pacer gait trainer has three weight-bearing support options: the multi-positioning saddle (rigid), hip positioner (semi-flexible) and the pelvic support (flexible).
The Pacer Gait Trainer Multi Positioning Saddle (MPS)
 The multi-positioning saddle (MPS) is a rigid weight-bearing support that provides the highest degree of control over pelvic positioning and alignment. The MPS works especially well with the dynamic upper frame to facilitate weight shifting, step taking and absorption of excessive spastic movements while still maintaining a well-positioned pelvis.
Watch Getting to Know the MPS Adjustments:
On the MPS, the saddle depth adjustment offers anterior and posterior positioning of the pelvis in relation to the upper body during gait. To encourage forward movement and step initiation, position the pelvis slightly behind the upper body.
Use the saddle angle to place the pelvis into anterior or posterior tilt for the most effective gait pattern and adjust the hip corral depth and height to cushion and support the pelvis at the level of the ASIS.
Transfers with the MPS are generally easier and safer, especially with heavier clients. After lowering the upper frame and MPS to align with the seating surface you can ease the clients onto the saddle. Then raise the client into an upright position by lifting the upper frame.
Watch Dynamic Pacer Transfer using the MPS:
The MPS’s secure positioning is perfect for heavier clients with minimal weight-bearing abilities or clients with significant postural challenges including ataxia or spasticity. The firm padded cushion of the MPS has the added benefit of an abduction prompt for moderate leg separation.
The MPS can be reversed when using the Pacer in the reverse.
The Pacer Gait Trainer Hip Positioner
 The hip positioner is a semi-rigid weight-bearing prompt. The seat is wide at the back to support the user’s weight securely under the ischium. Add a hip positioner pad for comfort or additional leg abduction.
Four adjustable straps attach the hip positioner seat to the frame and help position the pelvis as needed. With the gait trainer frame in the anterior position, attach the two rear straps onto the handhold posts positioned at the back of the frame.
Front strap placement can vary depending on which prompts are in use and the desired position for the user.
 Attaching the front straps to the chest prompt crossbars or posts will position the user’s pelvis slightly behind the trunk for a forward-leaning position.
 Attaching the front straps in front of the chest prompt clamp, to the front bar of the frame or to the arm prompt posts will facilitate upright positioning. Adjust the length of all four straps to assure optimal positioning. For instance, shorten the two rear straps or raise the handholds to create an anterior pelvic tilt. Shorten all four straps to adjust the height of the hip positioner. Because each user is different, a therapist should decide which positioning promotes optimal gait mechanics.
As the user gains leg strength, lower the hip positioner. When the user no longer needs weight-bearing assistance, lower the hip positioner further to use it as a safety sling.
The Pacer Gait Trainer Pelvic Support
 The pelvic support is a flexible weight bearing prompt, useful for clients who demonstrate good hip stability and control, or as a progression from the more rigid MPS. The softer, narrower design of the pelvic support is ideal for the youngest walkers and others who need weight-bearing support with minimal abduction or those who find the hip positioner and MPS too bulky.
 Like the hip positioner, the pelvic support attaches to the frame with four straps. Generally the pelvic support is most effective and comfortable when the posterior straps are positioned closer to the anterior straps, by turning the rear attachment handles around to face the front of the Pacer.
Attaching the front straps to the chest prompt crossbars or posts instead of at the front of the frame will position the child’s pelvis slightly behind the trunk for a forward-leaning position.
The pelvic support can also be lowered to serve as a safety sling when a user no longer needs weight-bearing assistance.
Pacer Gait Trainer Thigh Prompts
 The thigh prompts assist with leg alignment and adduction control during gait and help prevent a child’s body from twisting in the Pacer. Attach them to the frame halfway between the chest prompt and the back of the frame. Loosen the knobs for positioning up or down as well as medially or laterally. Position the cuff of the thigh prompt just above the user’s knee and snug it to control internal rotation movement.
Sometimes the post of the chest prompt protrudes below the top bar and interferes with the thigh prompts. To avoid this interference, try moving the thigh prompts to the inside top bar of the frame.
 Ankle Prompts on the Pacer Gait Trainer
The ankle prompts attach under the bottom bar of the frame. This prompt helps to control foot positioning and can prevent scissoring. Slide the spring adjusters along the bar to set stride length or guide step placement in relation to the body.
Casters of the Pacer Gait Trainer
The Pacer’s casters allow a precise control over the Pacer’s movement. They have four major functions: brake, swivel lock, variable drag, and directional lock. An odometer on the front right wheel is an option available at the time of purchase.
Watch Functions of the Pacer Casters:
 The wheel brake fully locks the wheel, allowing safe transfers into the gait trainer. Lock all four wheels for standing and weight-bearing practice.
The swivel lock holds the wheel in a straight line. Engage all four to keep the Pacer moving in a straight line. Engage the swivel locks on the rear casters to help the user steer by preventing lateral drift.
 The directional lock prevents backwards movement. This is particularly helpful for a client who has difficulty maintaining forward movement during gait. For best effect, use this feature in conjunction with the swivel lock.
The variable drag function creates resistance on the wheel. Use it to slow down fast uncontrolled gait or to strengthen leg muscles. For clients who tend to veer to one side while walking, set the drag on the opposing rear caster.
See Guidelines for Functional Use of the Pacer Gait Trainer Part I.


