Rifton TRAM FAQs
| April 2017Who uses the TRAM?
The Rifton TRAM is a multi-purpose device used for sit-to-stand lifting, gait training, assisted transfers and toileting.
The TRAM is used by children and adults presenting with a wide range of developmental and acquired disabilities including TBI, CVA, SCI, post hip replacement surgery, muscular dystrophy, multiple sclerosis and cerebral palsy.
Always have a qualified healthcare professional assess the appropriateness of the TRAM for each situation. The TRAM may not be the best solution for those with very low tone and poor head control.
The TRAM works well in schools, rehab facilities, hospitals, home health and home care situations.
Can I use the TRAM for an individual with a G-tube, baclofen pump or catheter? What about a back brace (TLSO)?
While the TRAM has been effective in these situations, it should be used only with the guidance of a qualified healthcare professional who should make the final determination whether the TRAM is appropriate. For a G-tube or baclofen pump, consider placing a foam donut or other cushioning around the site.
What are user limits of the TRAM?
User weight limit is 350 lbs.
User height limit is 6’4”. If gait training with a child or short adult, the standing armpit height should be over 30 ½”.
User girth limit is 60”.
Note: Because the TRAM’s body support system is 7” high and secures low on the trunk, the TRAM may not be suitable for an individual with a very short trunk.
Is the TRAM a floor lift?
No. The TRAM does not go low enough to lift a person up from the floor.
How is the TRAM different from a Hoyer or standard sling-type lift?
1. The TRAM accommodates three functions in one device: seated transfers, sit-to-stand transfers, gait training.
2. No cumbersome pre-transfer sling placement.
3. Transfers are generally faster, easier and more convenient with the TRAM.
4. The TRAM lifts from above the waist which is great for toileting.
5. Transfers are often possible with just one caregiver.
6. Patient is lifted in an upright position with dignity and comfort.
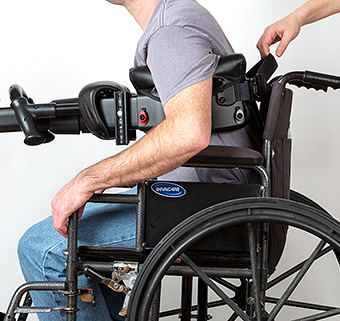
Will the TRAM body support system ride up under the armpits during transfer?
Correct positioning of the body support keeps it from riding up. When preparing for a transfer, position the body-support low on the trunk, just above the iliac crests. Make sure the rear strap is firmly secured at the back. Reference the TRAM Seated Transfer video.
Reference TRAM Tips and Advice article.
Note: A shirt made from a slippery material will make lifting more difficult. Avoid multiple layers of clothing.
Does the body support system create pressure under the arms during a transfer?
No. When positioned correctly (low and secure on the torso), the soft upper portion of the body support system minimizes pressure to the axillary area.
What if the user sags during a seated transfer?
If the user sags during transfer, lower back down and repositioning the body support system and thigh straps:
1. Snugly position the lower edge of the body support system just above the iliac crests. Try raising both of the user’s arms simultaneously (and gently pulling upward on any soft tissue if they are overweight). Instruct the individual to slowly breathe out while securing and buckling the body support system.
For a leaner build, sometimes a folded towel wrapped around the torso or placed in between the trunk and the front of the body support system provides additional security and grip.
2. For large or low tone users try positioning the thigh straps further back under the buttocks to support the ischial tuberosities and prevent sagging. With the front strap ring attached to the yellow clip on the body support system, lift the user’s leg with one hand while working the strap back under the thigh and buttocks with the other. Attach the rear strap ring to the blue or grey clips. Cinch the thigh straps at both ends.
Note: You may also position the straps prior to bringing the TRAM up to the individual.
3. Choose the appropriate width of thigh strap: The wide (7”) straps are best for someone who is obese, heavier than 200 lbs, or has low postural tone. Otherwise use the 5” straps for best fit and cinching.
4. Consider attaching a third thigh strap as a sling for the buttocks as soon as the user is lifted from the seating surface. Attach strap from one white clip to the other (or one blue clip to the other).
5. For someone with good shoulder and upper extremity strength, use the forearm supports to position the elbows under the shoulders. By leaning on the supports, the user takes weight through the shoulder girdle preventing sag.
Alternatively, place the forearm supports slightly forward, and the individual “pulls” on them to maintain optimal body position during transfer.
During the transfer, encourage the user to lean forward, gently press legs down on the thigh straps, or use the arm prompts for support, to reduce sagging.
Reference TRAM Seated Transfer video.
Reference TRAM Tips and Advice article.
When should the forearm supports be used, and how should they be positioned?
The forearm supports are frequently used for weight-bearing assist through the shoulder girdle during transfers and ambulation especially when adjusted to the rear-most position, under the individual’s elbows.
They are also great for individuals who need to hang on to something for a sense of control and security while being lifted or transferred.
Reference the TRAM Quick Reference Guide, page 9 for the wide range of positioning options and adjustments available on the forearm supports.
How do I adjust clothing during a toilet transfer?
As every individual is different, there are multiple approaches to clothing adjustment during a toilet transfer when using the TRAM. Here are some successful approaches:
- Standard Toileting Approach, page 10
- Toileting an Individual with Partial Weight-Bearing Capabilities
- Toileting an Individual with High Tone (case 1)
- Toileting a Non-Ambulatory Individual with Contractures (case 2)
- Toileting a Non-Ambulatory Individual with Low Tone (case 3)
- Toileting an Individual with Good Trunk Tone and Weak Lower Extremities (process A)
- Toileting an Individual with Moderate Weight-Bearing and Poor Trunk Tone (process B)
- Toileting an Individual with Muscular Dystrophy (process C)
- Use of Thigh Straps In Sling Configuration
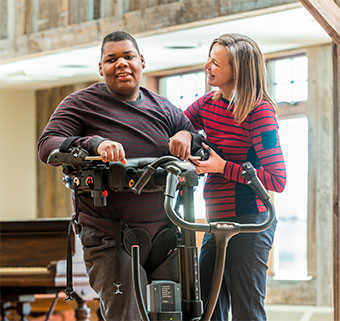
How do I position the walking saddle for ambulation?
Encourage a forward-leaning posture by hooking the walking saddle rings onto the rear attachment points (blue and grey). This will bring the individual’s pelvis behind the shoulders (the reverse is also true, in cases where the pelvis needs to be brought forward).
For people of average height and weight the saddle will fit and function best if the straps are crossed. Reference page 18 of product manual.
Larger individuals, however, may find crossed straps uncomfortable. Clinicians know their clients best and will be able to determine the optimal positioning of the pelvis and the most comfortable configuration of the walking saddle.
Is the TRAM walking saddle comfortable for men?
Yes. The wider rear portion of the walking saddle supports weight at the ischial tuberosities and buttocks. The front straps secure around the upper inner thigh, similar to a rock climbing harness. If discomfort persists check to make sure the saddle is far enough forward, with the rear portion well under the buttocks.
Note: The walking saddle often fits best with the front and rear straps crossed on the body support system.
Can the TRAM be used for gait training without the walking saddle?
Yes. Individuals with full weight bearing capability but needing balance support find the security of the body support system sufficient.
We do, however, recommend lengthening the straps of the walking saddle to use solely as a fall-arrest harness
Is there a way to position the walking saddle under a user, without doing a seated transfer first?
Yes. This is done with frictionless slide sheets.
Reference video Using Slip Sheets to Position the TRAM Walking Saddle
In some cases, it is possible to position the walking saddle under the user by folding it over, and then assisting the seated user to shift weight onto one buttock as you slide the folded walking saddle under the other buttock. Then, assist the user to shift weight over onto the other buttock as you reach beneath and unfold the saddle the rest of the way.
Can the TRAM be used in the reverse position?
Yes. Place the walking saddle onto a stool, bench or the corner of a mat table. Transfer the user to sit on the walking saddle. Bring the TRAM up behind the user and attach the walking saddle clips as appropriate. Remove the seating surface or assist the user to sidestep away from the seating surface while transitioning to a stand.
For users who do not require the walking saddle, perform a sit-stand transition with the user facing the caregiver handle. Support them at the arms or shoulders to maintain the standing position as you turn the TRAM around them until the caregiver handle is behind the user.
How many lifts can the TRAM perform on a fully-charged battery?
A fully-charged battery delivers approximately 70 lifts at the maximum weight of 350 lbs.
How often should I charge the battery?
For maximum battery life, charge it overnight at the end of every day (even if the battery level light is still green).
Charging takes six hours. The charger and indicator light will shut off automatically when charging is complete.
We recommend you always charge the battery even when the TRAM is not in use and/or in storage.
How long will the TRAM battery last?
With daily charging the battery can last for five years.
What else do I need to know about the TRAM battery?
Charge the battery for 24 hours before the first use.
No battery lasts forever. Dead batteries should be responsibly recycled.
http://www.call2recycle.org/locator/
Should I buy a second battery?
Probably not. A fully charged battery has plenty of power to last through a day of heavy use. And one battery that is charged every night will last longer than two batteries that are only charged occasionally.
Are there any trouble-shooting tips for electronics or power-related issues with the TRAM?
First, always check that the battery is charged and inserted correctly in the box.
If the battery indicator light is green but the lift does not go up or down - - or else it only goes up, or only goes down: This is likely caused by a faulty switch in the caregiver handle. Check that the wires at the bottom of the control box are plugged in properly. Then check to see if the down-arrow emergency lowering button on the battery box works. If the lift can be lowered using the emergency lowering button, then the caregiver handle should be replaced.
If the battery indicator light does not go on, and the lift does not move when you press the up/down switch: Call to replace battery box.
If the lift goes up or down without pressing the up/down switch: Use the emergency stop button if necessary.
Otherwise unplug the caregiver handle cord. If doing this stops the motion, then the caregiver handle should be replaced. If this does not stop the motion, the battery box should be replaced.
If the light on battery box is red and the lift does not go up or down: The battery level is critically low. Use the emergency lowering button on the battery box. Recharge the battery.
If the battery indicator light is green when inserted but then blinks out when the up/down switch is pressed: The battery is not holding a charge. Replace battery.
How is the TRAM's scale used to measure an individual's weight?
Place all the accessories that will be used during the transfer onto the TRAM, then zero the scale. Lift the user in a seated transfer. The scale will display the user’s weight.
How is the TRAM's scale used to measure weight bearing during gait training?
There are two ways to measure weight-bearing during ambulation:
Method 1: With the TRAM accessories in place for gait training, turn on and zero the scale. Once the client is lifted and in the walking position, the weight displayed is the amount of weight that the TRAM is bearing. To find the amount of weight the client is bearing, subtract the number on the display from the individual's full body weight.
Method 2: Using the thigh supports and the seated transfer procedure, lift the user with the TRAM. With the full weight displayed on the scale, press the zero button. Next, re-position the user for ambulation. The weight displayed will now be the amount of weight the client is bearing.
Note: It may be easier to initially position the user in the walking saddle and momentarily lift off the floor to zero the scale. Reference TheraFit TRAM video starting at 5:00.
Are there any tips for difficulties with steering?
The TRAM has optional direction locks to help with steering. Reference TRAM Swivel Locks help with steering.
Is the TRAM stable enough for transfers with only two locking casters at the caregiver end?
Yes. The TRAM has been tested for stability with the two locking casters.
Note: Two additional locking casters can be supplied on request.
Can the TRAM be used to transfer to or from a supine or prone position?
No. The user must be placed in a seated position at the edge of the bed or mat table before being secured in the TRAM.
Can the TRAM be used to position a user on an exam table, mat table or changing table?
Yes. The TRAM can lift a user into a seated position on the edge of a table. The caregiver can then pivot the user into a supine position.
Can the TRAM be used to custom mold seat cushions?
Yes. The TRAM is ideal for custom molding seat cushions. With the TRAM, it is possible to lift someone onto the seat simulator with no surface contact until the moment of full imprint. Reference Using the Rifton TRAM for Molding Seat Cushions.
How do I find the TRAM videos on Rifton's website?
http://www.rifton.com/resources/video-categories/videos?product=rifton-tram
How do I find sample Letter of Medical Necessity for the Rifton TRAM?
http://www.rifton.com/resources/article-categories/letter-of-medical-necessity?product=rifton-tram
How do I find TRAM-related articles on Rifton's website?
http://www.rifton.com/resources?product=rifton-tram
Note: Narrow the search by selecting a specific topic or category.
Does Rifton offer tools for staff training in use of the TRAM?
Rifton TRAM Safe Patient Handling Training Documents
Consider offering a live streaming webinar to groups that want customized TRAM training. Contact Rifton to inquire.

