Functional sitting with the Activity Chair
A webinar by Lori Potts, PT
This 30 minute webinar provides a demonstration of adaptive seating explaining features and accessories designed for therapeutic and functional use.
Watch Part 1: Sitting for Participation: What does the research say?
Transcript
So today we’re looking at the features and accessories of the Rifton Activity Chair, and we’ll discuss the therapeutic and functional use of these, specifically for the functional sitting position, as we go along.
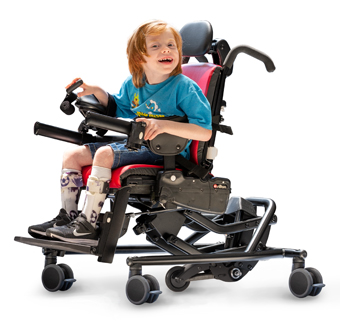
So what we see here is two of our Activity Chairs, this one is medium and this one is large. The large can serve up to a 250 pound individual; this can serve up to 150 pounds. We do have a small size for up to 75 pounds.
The difference that you see here is that this one is on a high low base and this one is on a standard base. So we have small, medium, large in standard and we have small, medium, large in the hi-lo.
The push handles are appropriate when you plan to move the chair around the classroom or school. They are height adjustable for ergonomics, and removable – think about taking them completely off for that yearbook or class photo, maybe with the headrest also off for just that moment as well. We also offer different color options of the pads; you can check out the website for those.
Now for the standard chair, the casters are a little smaller diameter for going over those door thresholds. You can get height adjustment which is done with a push button on the actual leg. So you would need to do the height adjustment when the child is not in the chair. And you do also have the option for non-mobile. But do be aware that it is quite a hefty chair so that would be in a case where you don’t anticipate moving the chair around that much.
There is a direction lock and just as with the hi-lo, there’s the direction lock, the idea here is kind of like a shopping cart, that guidance for steering longer distances. And then of course you can set the brakes whenever you need to as well.
Now there are two leg size options legs for the standard. For the same size of chair, the lowest position on this standard is going to be the same as the lowest position on the hi-lo. So if you are thinking about seat height from the floor, the range that is available with the hi-lo chair is the same as the lowest position on the shortest leg of the standard chair up to the highest position of the longest leg on the standard chair. Now on the hi-lo you can get that whole range with the child in the chair simply by using this foot pedal. The medium and large have a foot pedal for that up and down height adjust. The small chair has a hand held height adjust.
You will notice that as you are lowering the child, you do that by lifting this pedal here with your foot, and at a certain point it is going to stop. That is a safety, we don’t want that landing on anyone’s foot. The way that you are going to get that last bit of distance is by lifting this red latch here so that it clears the bar and lets you go the whole way down. In terms of participation this is ideal for circle time with your class, playing with peers on the floor, access to the pets at home, that type of thing. Whereas the high position is going to be ideal for getting up to the cafeteria table, or up to a sink to wash hands, a computer table. So definitely, that option for accessing the educational environment in an Activity Chair versus a wheelchair is certainly an advantage.
Another benefit that we see is tilt-in-space. This is a simple one-handed adjustment here that is available on the hi-lo and on the standard. The anterior tilt in space is 15 degrees forward on both chairs. Anterior tilt can promote back extension in sitting. On the hi-lo, the posterior tilt goes all the way to 25 degrees. With the standard base, that only goes to 15 degrees, so that would be 15 degrees forward and 15 degrees back. Here is the index that shows those angles. We know that 20 degrees of posterior tilt-in-space is needed for effective pressure relief. So that is another consideration. Certainly the standard chair is a lot more economical, but those are some of the limitations.
The backrest angle has the index here, and for both chairs, the backrest adjusts from 5 degrees forward to 20 degrees back. The adjustment for the backrest is here, this little white lever. All the adjustments points on the chair are white. Recline will open up the angle at the hips; that is considered beneficial for the hip joint. This is an independent adjustment from the tilt-in-space, which is important, because the recline with the seat horizontal can increase some reflex extensor tone for some children. This way you can combine the recline with tilt-in-space or use just tilt-in-space.
We also have the option for spring adjust. The spring adjustment is great for those kids who need that dynamic movement in the backrest. They may have extensor tone or habitually like to get that movement. Research has shown that enabling that backrest movement helps keep the child’s pelvis seated at the back of the chair. They won’t be moving forward into to a more sacral sitting position over time. As well, it also will sustain the durability of the product. You can upgrade to a dynamic spring backrest by ordering just this component for your existing chair.
Then in addition with the standard base we have that option for that spring adjust, not only in the backrest but also in the seat. This is helpful for a child with cerebral palsy who needs that rocking, that proprioception, to help with centering them. Or your child with autism this is a very nice chair, the standard chair, you can even get it without wheels so that it doesn’t move anywhere on the floor, it just has its stationary spot. And the child is obtaining the movement that they require in one stationary place. They are not needing to run around the classroom for example. In fact, any child with vestibular or tactile hyposensitivity who has a movement-seeking or sensory-seeking behavior and bangs against the backrest would benefit from this.
Now another thing to point out with this spring is that you can lock it out. As we look at the index for the backrest here, you’re only going to get that full range at the backrest when the spring is unlocked. If I lock the spring, that will eliminate 10 degrees or so of the range, depending where I lock it. So if you need the full recline, you will want to make sure you lock it at the maximum recline. If you need the full forward, make sure that you lock it at that forward position.
Now we have the seat itself. Whether you are on the standard base or on the hi-lo base, the features of the seat are the same. Let’s talk about sizing. One important consideration is the seat depth, because you need the knee to be able to bend comfortably with space behind the knee without dragging the child into a posterior tilt type sitting position. This adjustment allows you to lengthen and shorten the seat.
Seat width is another consideration, to assure that good seating alignment. That is done with the hip guides. This little white button here allows you to have some adjustability in and out. And then there’s also some up and down as needed for a particular child. So when we remove an armrest to make a lateral transfer more easy we can just remove the armrest and the hip guide with it.
Then there is also the footrest height. So important to assure weight bearing through the feet while sitting. That’s the little button on the side here, so you can lengthen and shorten the footrest depth. There is also an angle adjust which might vary depending on the tilt-in-space position of the chair, or the anatomy of the child. So you always take the time to make sure that the knee and ankle angles are enabling that full contact along the base of the foot. And this footrest does also accept the full weight of the child in case you would want to use that as a step up or a step down.
It’s also possible to swing it back underneath, and that’s cool for encouraging a child to get their feet right on the floor. You could practice sit-to-stand right out of the chair. Just make sure you have that seat forward enough and high enough for that option. You can then adjust the seat height and the angle, and think about the use of armrests by the child or maybe a table surface nearby so they have that early success with that sit-to-stand skill.
Rifton offers a footboard lift for all three sizes of the chair. If you can’t quite get it high enough, this allows you to get some added height and you can still raise and lower the footboard till you get it in the right place.
Then we also have the backrest height adjustment. And that is right here, that’s this little white lever that allows us to raise and lower the back. To fill that space in the case when it is in the highest position, we have the backrest filler pad to assure that contact at the back for pelvis neutral position, assuring surface pressure along the PSIS.
So for functional sitting, the surface contact along the back of the posterior thigh, and then the base of the feet, and then against the back will serve as your weight bearing base of support. That is why these dimensions are so important for sizing. We also really want to get the child all the way back in the chair.
For functional sitting, the pelvis and hip position is pretty essential as this will be your base of support. We start with the pelvis and hips as we often find that the best plan is to get that very well secured and stabilized, and then we can get away with fewer supports at the upper trunk and at the feet. That really is your foundation for sitting.
So every chair is going to come with a seat belt and it has a little attachment point, this is the only time a tool is required with the Activity Chair. Use either a pen or a key to just push that in and lock and unlock. Now you have two options for placement. So with a seat belt farther forward, you may, actually enable a little more active anterior tilt of the pelvis for forward lean of the trunk, versus having it secured back right on the pelvis. This other option may also matter if you’re using that butterfly harness and you want some flexibility in terms of where you attach each accessory.
Then we have the pelvic harness, this would be in place of the seatbelt. It attaches at the back of the seat just like the seat belt, the same mechanism with that flatter part toward the back and it can also be in either slot. This actually comes around the inside of the proximal thigh and buckles here. So what that is going to do is contain the pelvis at the back of the seat especially for these children with high extensor tone who tend to thrust forward in the seat. This has really been a popular solution with our therapists.
We already mentioned the hip guides and backrest filler pad which can be important for positioning the pelvis. And there is also a thigh strap, this would be ordered in advance from the factory and this little rectangle fits into a little t-shaped hole under the pad and it secures the thighs and moves forward and back with the seat.
This a lumbar seat and support kit which is optional for sliding under the backrest pad and also under the seat. This provides a bit of lumbar positioning and can assure support at the lumbar area to cue an anterior tilt at the pelvis. And the seat pad, you would use with the waterfall edge at the front under the knees. We suggest probably a two-thirds coverage so that you are capturing the ischial tuberosities behind this ledge depending on your seat depth. So as a child is progressing to independent sitting you can see how removing some of those external supports and rather using this might be just enough for them to cue their own postural control as they are working on developing their own sitting. There is a little bit of Velcro that can secure right onto the backrest under the pad. You can even carve the pieces to tweak it to accommodate pelvic asymmetries or scoliosis.
Moving down to the lower extremities we have an abductor. The abductor is helping the leg separation and it is contoured so that you’re sitting down over it or transferring up over it. It just secures right here in the front and has depth adjust as well. The large abductor can fit into the same slot on all three chairs, so could be very ideal when you want that abduction for postural management. Then we also have a leg prompt. This leg prompt attaches into the same point of attachment as that abductor. So it has these white buttons that give you some positioning in and out, and forward and back. This was secured just below the knee, basically helps to contain the legs should they tend to have extraneous movements, kicking out and so on. These are the adductors, they are less containing, they simply provide a boundary as needed.
We also have a sandal and that secures to a base and that secures onto the footrest so it is a stack and latch system. There’s also the option of including a wedge either for dorsiflexion or plantarflexion. Or, you can use two in opposite directions to stack and provide a difference in height in the case of a leg length discrepancy. With the holes on the footboard we can get a little bit of external rotation or abduction.
Then there is the ankle prompt. That just attaches at the back here, again providing a bit of a boundary, you can lengthen or shorten that strap to help hold the feet in place. This is an important point. The feet are an essential part of the child’s base of support in sitting, and you can see how particularly if you’re incorporating anterior tilt or some forward leaning, when the feet are solidly in position with weight bearing down through, this can help keep the hips back in the chair and the child can also control their own extensor tone. The MOVE Program and also Karen Kangas definitely emphasize this important point for postural control. We have to realize that children who have their feet in AFOs for so much of their life are not used to having that awareness of the ground reaction forces. It’s our job to properly position those angles at the knee and ankle for getting that total contact of the feet.
So then we will move right on up and look at our trunk support options. We have two styles of butterfly harness. These are designed with the lower clip the same as the seatbelt or the pelvic harness. Just be sure that when you are using a butterfly harness you always use either the pelvic harness or the seatbelt along with. This is not considered sufficient for hip positioning. We don’t want the child sliding out from underneath this. But we do have a very deep contour here to help prevent choking as well as the fact that this is incompatible with the buckle at the top so you can’t put it on wrong. This is definitely for the seat attachment and this is for the shoulder attachment.
Now this one is the slim cut. This is nice for if you’re putting a child into the medium chair who is almost too small for it, but you want to offer them room to grow. So this is the of the two styles for a smaller child. It can also accommodate G-tube feeding, or a baclofen pump that might be below the ribs. For older adolescence girls and adult women in the large chair, that may be more comfortable.
There’s also the wide chest strap and this just secures straight across the backrest. And there is an up and down adjustment as well, so a higher position where you’ve secured those straps more tightly, then you’re giving the child a lot more support. As they are gaining their trunk control you can loosen that and lower that and that will challenge their sitting ability, working to maintain their center of gravity over their base of support. And that might even be situation specific where in a certain activity you provide either less or more control, depending on what they are doing and the amount of attention they can give to their own postural control and postural positioning during that task. Therapeutically we may want to perhaps limit some of that trunk movement a bit when they are reaching for example.
Those same metal tracks at the back also accommodate the trunk laterals and should you need some anterior support along with the lateral that is where this flexible strap comes in. That can be placed so that it’s around the outside of the laterals, or it can be around the inside and closer to the trunk. You have that same height adjust in terms of those lateral support positions. For example, for a child with scoliosis, you may want to place that at the convexity of the curve, these are independently adjustable, there’s also some rotation and some in and out.
Now another way to promote truck control is with arm positioning. The armrests are height adjustable and angle adjustable and the tray slides right onto them. Once you have the tray on, there’s a little white lever on the side of the armrest so we can lift that and swing the tray up. The idea here is that the child can place their arms on the tray as a way to gain head and trunk control, so the child’s own arms become another support surface for that base of support. The depth of the tray is adjustable with a one-handed latch.
Of course, if there is a table or desk, we can tip these armrests down out of the way and come right up to a table surface rather than use the tray, and that’s much more inclusive. So if we think about that concept of forward tilt of the seat and weight bearing through the feet while in that position, and the backrest can also provide support or not, depending on that backrest angle and the level of the child’s own sitting ability as they are using their arms for support. Rifton does offer the Anchors and that’s a whole variety of supports that can secure right onto the table.
Similar to that, along the same lines, is the concept of using this bar with forearm prompts. So this attaches into the same slot as the armrest. The forearm prompt has height adjusts and can be moved into position as needed with the clamp or the position of the post, giving you some positioning options. It’s the same arm prompt we’re familiar with from the Pacer and it gives you some options for positioning the arms. For example, position both arms as the child is working on head control, perhaps they’re watching a movie, or for a child who has a lot of spasticity in one arm, you can control that and get better use of the arm that is free, perhaps with a communication device. We can also attach the arm platform from Rifton to this same bar, another great option for arm support. Another option is to completely remove any arm support and this gives us seating that is similar to a regular classroom chair, and that allows the child to practice and then eventually gain the ability to sit in a chair with no side supports.
So really we are talking about sitting as an activity, so whether you’re using your arms to reach or whether you are in a sitting position observing, your positioning will be a little bit different in terms of the amount of support that is provided for the child. So we may have times when we’re positioning for practice of head and upper trunk control that’s a little more intensive than at other times. So we may be supporting at the trunk to encourage arm movement, or we may be placing the arms as the base of support to work on that upper trunk and head control. So we’re always thinking about how do we encourage that postural control, how do we enable the activity that they are doing, but then build on their own intrinsic ability over time as well. That’s where creativity in the field comes in, with added supports, although of course Rifton cannot be responsible for modifications in the field, but that allows you to offer those practice opportunities.
That external support can be important to enable that activity to happen in the first place, but then we want to reduce that support, not only to substitute, we want to give them that chance to learn as they gain their own skills. And it may be activity specific in terms of the amount of support you are providing at the cafeteria table could be different than the support you are providing during circle time. So really it starts with head control or upper trunk control. We really can see gains if we provide those practice opportunities on a regular basis.
So speaking of head control, let’s look at options for the headrest. This winged headrest is the most supportive. It’s height adjustable, and you do also have these two knobs that allow for angle adjustment – height and angle adjustment. And then there is also these two knobs that allow you to work with positioning of those wings on either side, again, depending on the child’s needs. Then we also have a contoured and a flat headrest, these are also height adjustable as well as depth and angle adjustable.
Now if a child needs even more support than these options, we do have an attachment that allows the Activity Chair to be compatible with the Whitmyer headrest. If you are familiar with that, it has much more occipital support. So this little attachment right here allows you to simply remove those bolts and place this mounting in place, which then serves to enable you to mount the Whitmyer headrest..
Now when we position the pelvis really well and work with those lower extremity and trunk support ideas, and also that backrest angle, which in some cases, it might help to open it up a little bit beyond 90 and then to adjust the seat tilt with the tilt-in-space, we want to do what we can for that line of gravity to help with postural positioning. Especially that head position, we want that head in a good position for vision and access to the environment, as well as allowing the child to work on their own head control, rather than simply reclining them or using a posterior tilt for that head.
So the functional sitting position is a work in progress helping our children improve their ability for active sitting for participation. And that completes this webinar on use of the Rifton Activity Chair for functional sitting. Thank you for your attention and participation. Have a great day.
