The Rifton Pacer gait trainer is a remarkable piece of equipment designed to help people of all ability levels learn to use their motor skills for weight bearing and ambulation. Since the Pacer was introduced I have spoken with hundreds of therapists around the world who use this gait trainer with their clients and students and I’ve seen all kinds of configurations. Sometimes I see therapists who have identified specific goals for their clients but who have configured their Pacer incorrectly for those goals. Following are five common goals I’ve seen and how I’d recommend using the Pacer prompts to achieve those goals:
Goal 1: Take alternate, reciprocal steps
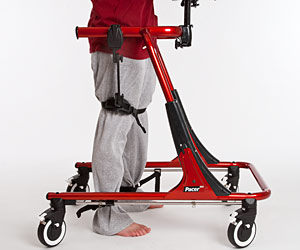
In the early stages of learning to take steps, the shoulder girdle should be forward of the pelvic girdle. In other words, the user should be leaning slightly forward. This encourages the stepping reflex while assuring that the user walks forward rather than pushing backward.
The hip positioner on the Pacer can help assure the optimal forward-leaning position. The front straps of the hip positioner should be attached to the upright posts of the chest prompt or the horizontal posts extending from the sides of the chest prompt. The back straps should be attached to the handholds placed at the rear of the Pacer. This configuration allows the hips to “swing” easily and encourages weight shift from one foot to the other.
Unfortunately, a common error is to attach the hip positioner to the front bar of the Pacer making it difficult to adjust the position of the hips and pelvic girdle. Improper attachment often encourages “sacral sitting” or curling the tailbone under and rounding the back. It is difficult to take steps and walk forward in this position.
Goal 2: Extend hips and knees to bear weight on feet
Most people who spend the majority of their time in a seated position eventually develop tightness in the hips and knees. They are then unable to voluntarily extend their hips and legs.
The Pacer gait trainer can be instrumental in helping alleviate this problem. Place the user comfortably in the Pacer dividing the body weight between the forearm prompts, chest prompt and the hip positioner and raise the height of the Pacer so the user’s heels are a few inches above the floor. In a few minutes, most people will relax enough for the heels to come down to the floor. If the legs don’t extend enough, adjust the height of the Pacer slightly. Now reciprocal stepping can be prompted.
The common mistake people make is keeping the Pacer so low that the legs never have the opportunity to extend. Permanent change occurs when movements are self-initiated and when many opportunities to move towards independent mobility are afforded the user.
Goal 3: Reduce the prompts and support while using the Pacer
Generally speaking, prompts on the Pacer are reduced in the following order: leg prompts, hip prompts, trunk support and lastly, the arm prompts. Each of these prompts can be reconfigured by degrees to give less support or guidance before being removed. It’s important to define specific learning goals before adding, removing or reconfiguring prompts. For example, if the goal is maintaining weight bearing on the feet while walking forward, the hip prompts can be lowered rather than removed. This maintains safety for the user without providing total support under the buttocks.
The most common mistake people make is removing the arm prompts first rather than last. For most users, the goal is to reduce the prompts until only the arms are used for balance and partial support when needed. This allows the user to change directions and “drive” the Pacer when walking. Some people with very strong primitive reflexes cannot tolerate a fixed arm position but should still be encouraged to place or replace the arms to guide the Pacer.
Goal 4: Shifting weight on the feet to take steps
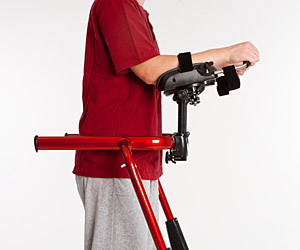
Often the hips are the most difficult joints for a person with physical disabilities to control. The head of the femur does not actually fit in a socket until weight-bearing has been well established. Muscles are responsible for holding the bones in alignment. If the muscles are weak or uncoordinated, the hips are difficult or impossible to control. For someone just learning to take reciprocal steps, part of the body weight can be supported through the shoulder girdle and arms by using the forearm prompts on the Pacer. This will allow the practice of natural hip sway while shifting weight from foot to foot.
The forearm prompts can be attached and configured in a variety of ways. In the early stages of learning, the user leans forward with the elbows close to the waist. The prompts can be rotated up and down as well as in and out. The arms and shoulders should be as comfortable and relaxed as possible while still helping to share some of the body weight. This, along with the proper attachment of the hip positioner, can make weight shifting much easier.

A common mistake is positioning the arms high and to the side of the body. I call this the “chicken wing” position and it does not usually provide enough trunk stability and body support to free up the hips for walking. To understand this phenomenon, take a rolling table or grocery cart and lean forward on it with elbows resting on top. Try moving your legs in a reciprocal pattern and see how easy and natural it feels.
Goal 5: Taking steps without scissoring the legs
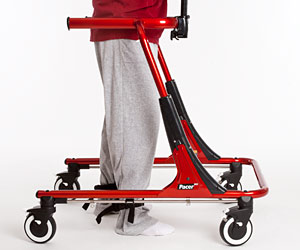
When scissoring is a problem, it is common for the feet to get locked together or trip over each other while trying to step forward. Many children find this terribly discouraging and they stop trying to walk. Scissoring can be corrected or improved with practice but thousands of repetitions are usually required. The Pacer can be equipped with thigh prompts to help with this training. When properly attached, the prompts can align the legs from the hips to prevent scissoring. With each step, the user puts pressure on the legs from the foot to the pelvic girdle helping mold the joints into an aligned position.
 |
 |
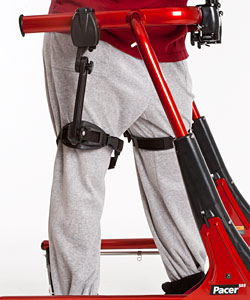
Several mistakes can prevent the thigh prompt from doing its job guiding the legs while the user is walking. The most common one is positioning the thigh prompts too high on the legs. The cuff should be right above the knees. The thigh prompts attach to the top bar of the frame. The gait trainer frame can be raised or lowered to adjust the height of the prompts. Fine adjustment can be made using the slide bars on the thigh prompts themselves. Another common mistake is leaving the cuffs loose above the knees. Tightening these straps will help keep the legs from rotating internally. When the toes turn in, the feet can trip over each other.
The third mistake is using the ankle prompts alone to correct severe scissoring. The ankle prompts will help separate the legs but they can encourage internal rotation of the legs by allowing the knees to “knock” together. For scissoring, they work best when combined with the thigh prompts. The ankle prompts are used to limit the gait of the legs; they keep the feet from stepping too far forward or dragging too far behind. Simply adjust the sliding clips on the rods of the ankle prompts to adjust gait length in this way.
Back to Top