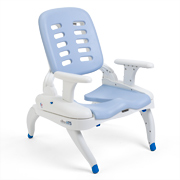
The Rifton HTS redefines toileting for people with disabilities. Superior tool-free adjustability and a broad range of supportive accessories provide a comfortable, effective hygiene experience. And although simple in design, the HTS can accommodate almost any situation. But to get the most out of your HTS you need to understand its broad capabilities and configurations.
The Basics
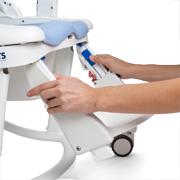
Adjustments. Adjustments on the HTS are user friendly. All points of adjustment are highlighted in blue and can be changed quickly (no tools needed).
Cleaning. Cleaning the HTS is easy: the chair was purposefully designed for all aspects of hygiene. The base, seat, back and accessories on the chair can be wiped down after each user with disinfectant wipes or a 10% bleach solution. In addition, all mesh accessories are machine-washable.
For a deep clean, the design of the HTS is such that accessories and components of the chair can be individually removed and thoroughly washed.
Sizing. The Rifton HTS is now available in small, medium and large with adjustments for growth built into each size. Required Hygiene and Toileting System components are the seat and back with a seatbelt, arm rests (low, medium or high) and a base or mounting bar.
The user’s overall height and weight are the important measurements in determining the right size of HTS. Make sure that seat width, depth, and height adjustability are adequate for each user. See Rifton HTS Dimensions
Seat and Back Features (Chair Options and More)
Backrest Adjustments
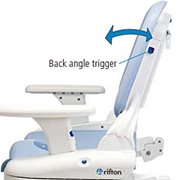
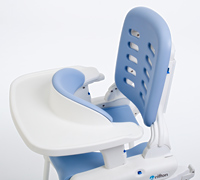
Backrest angle is adjusted by simultaneously squeezing the blue backrest angle levers on either side of the backrest and moving it to desired position. Backrest adjusts 6 degrees forward for a functional toileting position (see Optimal Toilet Positioning) and 6 degrees or 18 degrees backwards.
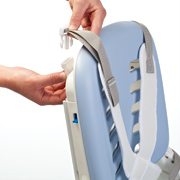
The backrest can also be completely removed for transport or cleaning.
Seat Depth
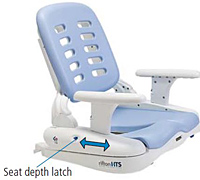
The seat depth is adjusted by lifting up on the blue levers on the outer sides of the seat (behind the arm rests) to slide the backrest forward or backward. For each size, seat depth can be adjusted in four 1” increments to accommodate for growth.
You can use this same adjustment to slide the seat off towards the front for cleaning underneath.
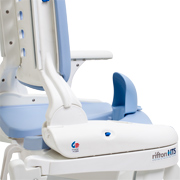
Seat and back pads
Natural contours have been molded into the firm plastic of the seat and back for basic comfort. However, seat and back pads are highly recommended for cushioning and greater comfort of the user. These integral skin foam pads easily snap on and off. The seat pad is designed with contoured leg troughs providing a comfortable degree of abduction.
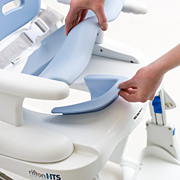
Two choices of seat pad are available:
Choose the open seat pad for an optimal hygiene experience. With the opening at the back of the seat pad, the caregiver can easily access the hygiene areas even while the client is seated. (If you have the tilt-in-space option, tilting the seat forward improves access even more.)
Choose the closed seat pad for improved stability while sitting. Because the seat is closed in the back and the hole narrower, you’re giving the client extra support in the seated position.
Tilt-in-Space
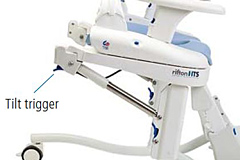
Tilt-in-space is offered as an option on the mobile base with a footboard. To adjust the tilt, use the trigger at the right rear of the seat to release the two locking gas springs. Tilt adjusts 15 degrees forward for transfers and hygiene care (see below) and 15 degrees back for comfortable positioning or showering. It is easy to tilt the HTS with your client in the product.
The tilt-in-space option on a mobile base allows the HTS to be used as a shower chair. Roll the chair into a shower and tilt back to accommodate hair washing.
Choosing a Base/Mounting Bar
A base or mounting bar is a required component when putting together a Hygiene and Toileting System. Five choices of bases are available:
- Mobile tilt-in-space with footboard. This base can be rolled over a regular toilet, used as a stand-alone commode or additionally (with the tilt-in-space), as a shower chair. The tilt-in-space also makes this base a good choice for clients requiring maximum support and comfort. Mobile bases come with four fully locking casters for safety during transfers and toileting. A footboard is required on a mobile base.
- Mobile non-tilt with footboard. Without the tilt-in-space, this mobile base is a more affordable option for using over a regular toilet or as a stand-alone commode. Mobile bases come with four fully locking casters for safety during transfers and toileting. A footboard is required on a mobile base.
- Stationary non-tilt. This base is used as a stand-alone commode. As it does not come with a footboard, make sure the frame height is low enough to position your client’s feet flat on the floor for added stability.
- Stationary non-tilt with footboard. This base is used as a stand-alone commode. The footboard is available for advanced positioning options of the lower extremities if required by the client.
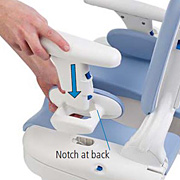
- Mounting bar. The mounting bar allows the HTS to be used on a regular toilet. It attaches at the back of a regular toilet with the same bolts that secure the seat and lid to the toilet (see Product Manual for correct placement). Once in place, the mounting bar is used as the point of attachment for the seat and back of the HTS. Just insert the hooks at the back of the HTS seat into the sockets of the mounting bar and lower the seat onto the toilet bowl. A footboard can be specified if desired.
The mounting bar can remain permanently mounted behind the toilet, but can also be removed if the client moves to a different school or home.
Two types of mounting bars are available to fit either standard round or elongated toilets. To determine which type of mounting bar you need, measure from the centerline of the seat bolts to the outer edge of the porcelain bowl. Use a standard toilet mounting bar if this measurement is 17 inches (43 cm) or less. Use an elongated toilet mounting bar if the measurement is greater than 17 inches (43 cm).
Choose an HTS Configuration
The variety of bases makes it possible to use the HTS in three configurations: On the toilet, over the toilet, or off the toilet as a stand-alone commode. Before selecting a base, consider how the HTS will be used according to the guidelines below:
On the Toilet: A mounting bar is required to use the HTS on the toilet. A footboard can be used with this configuration but needs to be specified when ordering the product.
Over the Toilet: The mobile bases (with the commode pan removed), can be used over a regular toilet. To minimize splashing, adjust the height of the base so it just clears the top of the toilet bowl before rolling the HTS over.
Off the toilet: With the commode pan in place, both the mobile and stationary base options can be used as stand-alone commodes giving the user the option to toilet where convenient.
Adjustments on the Base and Footboard
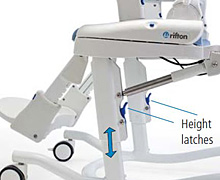
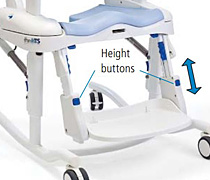
Height Adjustment
To raise the seat, flip up the footboard, stabilize the base with your foot and pull up on the seat frame. To lower the seat, squeeze both height latches on the frame uprights and lower both sides evenly to prevent binding.
This adjustment CANNOT be done with the client in the chair.
Footboard Adjustment
The footboard, with angle and height adjustment, supports a user’s feet in the optimal position. To adjust the angle, push up on both angle triggers while directing the footboard to one of the four angle settings.
To adjust height, push both blue buttons on either side of the footboard while moving the footboard to the desired height. The footboard adjusts in five 1” increments. Be sure the footboard latches into position.
For transfers, the footboard can be flipped out of the way or used as a step (for individuals less than 150 lbs).
Accessories
Accessories are available to customize the positioning in the HTS and accommodate a wide range of disabilities.
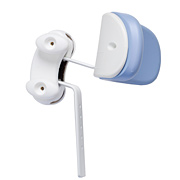
Headrest. The curved headrest provides support for clients with limited head control. Adjust height by pushing the blue headrest button and raising or lowering the headrest. Loosen the two white knobs at the back of the headrest to fine-tune the positioning up or down, anterior or posterior.
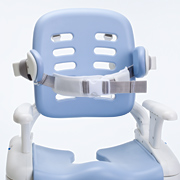
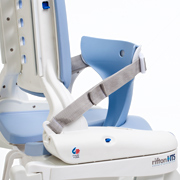
Butterfly Harness. The butterfly harness provides anterior support while allowing freedom of movement. To attach the harness, remove the center section of the seatbelt and replace it with the butterfly harness which has a built-in seatbelt. Adjust seatbelt tension then clip the shoulder straps to the sockets on the backrest.
Tip: For smaller users, thread the shoulder straps through the upper slots in the backrest, then clip into place.
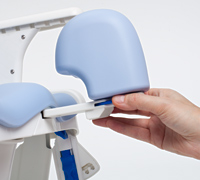
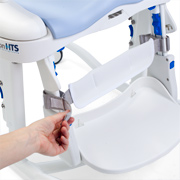
Anterior Support. The anterior support resembles a tray with a built-up and padded surface for leaning on. This provides an excellent, forward-leaning toileting position with trunk and arms supported by the tray. To adjust the tray depth, squeeze latch under the front of the tray and pull/push until it clicks into one of the three latched tray positions.
Lateral Supports. Lateral supports provide comfortable side-to-side positioning and alignment for individuals with limited trunk control. The laterals can adjust independently to accommodate for spinal curvatures or trunk abnormalities. To install and/or adjust the lateral support, loosen the white knob, insert key into extrusion behind the backrest and adjust the height, angle and width of the lateral to fit the user. Lateral supports can be purchased either with or without a chest strap.
Chest Strap with lateral supports. The chest strap is used in combination with the laterals to provide anterior support. Thread the loop at either end of the chest strap over the knob and key assembly of lateral supports with chest strap buckle facing outward. Loops can be threaded so that chest strap encompasses lateral supports, or so that it straps on the inside of lateral supports.
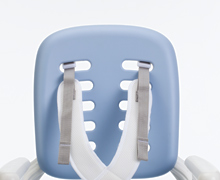
Seatbelt. A seatbelt comes automatically with every chair. ALWAYS use a seatbelt to avoid falls or the risk of strangulation would be presented when using a chest strap, butterfly harness or anterior support without a seatbelt. The seatbelt is clipped into the slots behind the seat on either side of the chair.
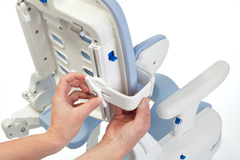
Hip guides. Hip guides provide additional lateral support to user’s hips and can be adjusted for seat width. Adjust the seat width by removing the arm rest and threading the arm rest support post through one of the two slots in the hip guide. The notch in the slot should be facing the back. Replace arm rest to lock hip guide into position. Additionally, the easy removal of both the arm rests and hip guides makes it perfect for lateral transfers into the HTS.
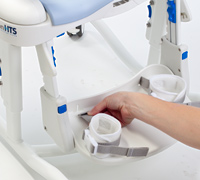
Pan. The pan is used for the stand-alone commode configuration (off the toilet). From behind the chair, slide the pan into the slots underneath the seat. The pan was designed with extra depth to prevent spillage when used with the tilt-in-space base. Smooth contours and a pour spout make cleaning up simpler and easier.
Deflectors. Deflectors keep clients and caregivers clean during urination. A low deflector is already built into the foam seat pad, but if more protection is needed a removable standard deflector and splash guard are available.
The standard deflector requires the integral skin foam seat pad for mounting. It slides into the notches in the foam padding at the front of the hole.
The splash guard offers full protection. It mounts at the front of the toilet seat and is held in place by the seatbelt.
Bowl Adapter. The bowl adapter is a soft blue plastic insert that is used to accommodate situations where the hole in the HTS is not completely aligned to the hole in a regular wall-hung toilet. The bowl adapter inserts at the front edge of the hole under the seat pad. It can also be used with the large HTS to create a secure fit over a round-front toilet.
Abductor. The foam-covered blue abductor provides comfortable positioning and alignment of the lower extremities. While depressing the blue clip, slide the abductor into the slot at the front of the seat. The abductor attaches adjacent to the standard deflector to help maintain the position of the deflector while abducting the legs.
Ankle Straps. The soft mesh ankle straps provide proximal control and positioning of the feet of those with limited muscle control while still enabling a moderate range of movement. The tabs at the end of the straps slide into the slots at the back of the footboard. Ankle straps can be adjusted both in length and in snugness.
Calf rest. The attachable soft mesh calf rest is available for added comfort and security behind the user’s legs especially when the footboard is extended and angled up. The calf rest attaches on the footboard uprights. Loop the calf rest webbing around the uprights and thread it through the metal ring at the front, engaging the hook and loop snugly around uprights. Note: the calf rest cannot be used when the footboard is in its highest position.
Versatility
The HTS was designed to accommodate two core functions: toileting and bathing. To broaden the scope in which the HTS may be used, two additional bases are available- -the tub base and the portability base.
Tub base
Both the small and medium HTS seats attach onto the tub base. With a reduced footprint, the tub base can be used in even narrow tubs.
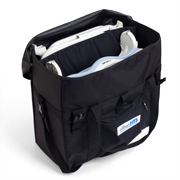
Portability kit
The portability kit gives children greater independence – and their families greater freedom to travel – by enabling them to take the Rifton HTS on the road. A light-weight folding frame combined with the small or medium seat and back can be stowed in a carry bag to make toileting possible while traveling.
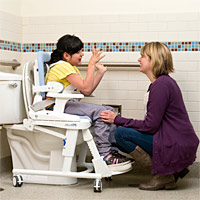
Transfers with the HTS
Lifts and transfers present a major challenge to successful toileting. The Rifton HTS makes them easier with a variety of features.
Sit-to-stand transfer: For a sit to stand transfer or vice versa, flip the footboard up and using the tilt-in-space (if available), tilt the chair forward. This makes it easy for a client who has poor muscle control or muscle weakness to transition to standing and allows active participation in the transfer.
Lateral transfer: For a lateral transfer, remove the armrests and lateral supports from one side of the HTS to allow a client to slide over from a wheelchair.
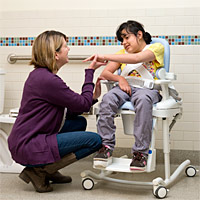
Step-pivot transfer: The footboard can be used for step-pivot transfers into the HTS. The weight capacity of the footboard is equal to the maximum working load of each size. Do not use the footboard as a step when it is angled up.
Optimal Toilet Positioning with the HTS
The Hygiene and Toileting System has the capability to support optimal toilet positioning for people with disabilities. Research has shown that the squatting posture is the most effective position for bowel and bladder elimination. Squatting relaxes the puborectalis muscle, straightens the rectum and works with gravity for faster, easier, and more complete elimination. In cultures that practice this positioning (and from studies of people in the West who have adopted this natural method), there is significantly less incidence of constipation and bowel diseases.
Tilting the HTS posteriorly and adjusting the backrest to its most forward position assists clients into a position in which the knees are higher than the hips for more effective elimination. An anterior support is recommended to further support the user in this forward-leaning posture. Adjust the footboard height to squarely and comfortably position the feet as well.
Note: Although this positioning is effective, it may not be ideal for every user. Positioning should be done according to what is comfortable and achievable for the user.
Back to Top