In the Pacer gait trainer children with a wide variety of disabilities can gain independent movement while provided with appropriate support. The Pacer accessories are infinitely adjustable to accommodate the individual needs of almost any person.
Many people use the Pacer without fully appreciating the adjustments that are possible. Last week we took a closer look at the Pacer frame and upper body positioning. In this post I’ll talk about lower body positioning and the Pacer casters.
The Pacer Gait Trainer Hip Positioner
 The hip positioner seat is wide at the back to help bear the child’s weight. It has four adjustable straps with which to position the pelvis as needed.
With the gait trainer frame in the anterior position, attach the two posterior straps onto the handhold posts located at the posterior end of the frame. Adjust the length of all four straps to assure optimal positioning. The seat portion of the hip positioner is raised by adjusting the height of the handhold posts and by adjusting the straps of the hip positioner. The anterior portion of the hip positioner should be located toward the front, between the child’s legs.
Options for the anterior strap placement will depend on which prompts are in use, and on the desired position for the child. The anterior straps can be attached to the lateral crossbar of the chest prompts or to the chest prompt posts.
 Attaching the anterior straps to the chest prompt will position the child’s pelvis slightly behind the trunk and will assure that the child is on the weight-bearing surface of the hip positioner. The anterior straps can also be attached to the arm prompt posts or to the front bar of the frame.
Or they can attach just in front or just behind the frame uprights, in front of the chest prompt. Each child is different, and a therapist or physician should decide which placement positions the child best for gait mechanics.
When the hip positioner is used to assist weight-bearing, it is important that the wider part of the seat is placed under the ischium and the straps are adjusted to the appropriate height. A hip positioner pad can be added for more comfortable cushioning. In some cases the pad helps promote hip abduction.
As the user gains strength in the lower extremities and no longer needs assistance with weight-bearing, the hip positioner can be lowered. Used this way, the hip positioner guides the pelvis and acts as a safety sling rather than a weight-bearing assist.
Pelvic Support on the Pacer Gait Trainer
Like the hip positioner, the pelvic support provides weight bearing assistance as needed while the client builds strength and stamina. But the pelvic support softer, more flexible, and narrower than the hip positioner. Some clients, such as those in early intervention or adolescents of a larger size, may not require the more rigid support or the amount of abduction that the hip positioner provides. The softer design of the pelvic support provides a more comfortable fit for larger users and for those whose legs have a tendency to scissor, or for anyone for whom  the hip positioner is simply too bulky. It is ideal for the youngest walkers and others who need weight bearing support with minimal abduction.
Generally the pelvic support is most effective (and comfortable) when the posterior straps are attached as far forward as possible, close to the anterior straps. This can be done simply by turning the rear attachment handles around as shown.
 Pacer Gait Trainer Thigh Prompts
The thigh prompts attach to the frame and are usually placed about halfway between the chest prompt and the back of the gait training frame. Loosen the knobs for positioning up or down as well as medially or laterally.
Thigh Prompts provide either adduction control or abduction control, depending on what is needed. The straps will maintain leg separation, and the outer curved portion will limit abduction. Using the thigh prompts can also prevent the child’s body from  twisting in the Pacer. Thigh prompts maintain leg alignment while swinging forward and back with the child’s leg motion.
Sometimes the post of the chest prompt protrudes below the top bar and interferes with the thigh prompts. If so the chest prompt clamps and the thigh prompt clamps should be placed on opposite sides of the top bar of the frame. Alternatively, the height of the frame can be lowered and the chest prompt post moved higher up so that the post does not protrude as much.
 Ankle Prompts on the Pacer Gait Trainer
The ankle prompts attach under the bottom bar of the frame. This prompt can be used to control foot positioning and prevent scissoring. The spring adjusters can slide along the bar to control stride length.
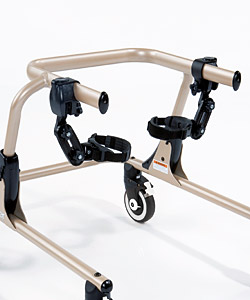
Casters of the Pacer Gait Trainer
Finally, casters are an integral part of the Pacer and critical for directing and controlling movement in the Pacer. They have four major functions: brake, swivel lock, variable drag, and directional lock. Here’s a great resource to guide you through the clinical applications and functionality of each feature of the Rifton Pacer caster.
Please note: This article does not replace the direct personal involvement and guidance of a medical professional.
Back to Top