Introduction
The Rifton Activity Chair accommodates most individuals with special needs, with its wide variety of chair features and accessory options. It is a positioning chair intended for classroom and home use enabling its users to learn functional sitting skills while actively participating in activities, tasks, and routines.
A functional sitting position (rather than restrictive seated positioning to retain symmetry and limit tone) means that a client can actively use and develop his or her own core muscles and improve their own postural motor skill, allowing the caregiver to further reduce accessory support over time.
Chair size
The Rifton Activity Chair is now available in Small, Medium and Large sizes, each with the option of either a Standard or Hi/Lo base.
The user’s overall height and weight is a general guide to decision making. Make sure that seat width, depth, and height adjustability are adequate for each user:
Rifton Activity Chair dimensions
Frame base options (Standard, Hi/Lo) and seat height
Standard Base: The Standard base offers short or long legs, with adjustability of a 4 inch range. Leg options include with or without lock-in-place casters. The floor-to-seat height varies with the different leg choices. (See section on Footboard to compare to the footboard-to-seat height.)
Highest floor-to-seat settings (in inches):
- Short legs (16.5)
- Short legs with casters (20)
- Long legs (23)
- Long legs with casters (also 23)
Note: One of the legs with casters comes with a swivel lock — this leg should be placed on the right rear corner. The swivel lock keeps the chair from drifting sideways when it is being pushed forward. (Figure 1)

Hi/Lo Base: The Hi/Lo base offers a quick and easy seat height range from a 12–inch low to a 23–inch high. The foot pedal located at the rear of chair will raise and lower the chair seat. To raise seat, pump downward repeatedly on foot pedal until desired height is achieved. To lower seat, place foot under the foot pedal and lift to release the red safety lock, then continue to lift the foot pedal upwards with your foot. Stop when seat has descended to the desired height.
Chair options and features
Spring Option
Spring option allows user–initiated movement, allowing the chair to "bounce." This can offer a self–calming effect for individuals with autism, as well as "give" in the backrest for those with extreme extensor tone. The chair can be ordered with spring or without spring.
The Standard base has a choice of spring with backrest and/or spring with seat tilt–in–space. (Figure 2) The Hi/Lo base only offers a backrest spring.
To determine whether spring is locked or unlocked, press firmly against backrest (or Standard seat.) If it "gives," the spring is unlocked. If it does not "give," the spring is locked.
To activate the spring, turn white lock handle located on spring column (located behind backrest or under Standard seat) to "unlock" position (Figure 3). To deactivate spring, turn lock handle back to "lock" position.
Note: The Spring option enables about 10° range of movement. Thus, angle adjustment of backrest or seat will be more limited when spring option has been ordered with your chair (Figure 4)
Locked Options on Backrest
There are two locked (non-dynamic) positions on the backrest gas spring. When locked, each position provides 15˚ of angle adjustment using the backrest angle lever.
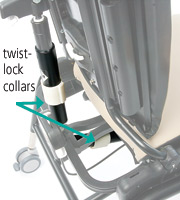
Activity mode (-10˚ to +5˚): To lock the backrest in the upright or forward position for activities, turn the twist-lock collar to the right until it locks. With the angle lever adjust the backrest angle forward or back 15˚. Note: When locking the backrest spring option, it may be necessary to move backrest forward or back to enable twist-lock collar to slip into position. (Figures 5 & 6)
Relax mode (-20˚ to -5˚): To position and lock the backrest for reclined resting, unlock the white twist-lock collar. Push down and back on the top of the backrest (not on the headrest) until the groove around the movable gas cylinder almost retracts into the outside cylinder. While still holding the backrest down, turn the white twist-lock collar to the right until it locks. This function is easier to perform with your client in the chair. Once locked, adjust the angle of the backrest forward or back 15˚ using the angle lever (Figures 7 & 8)
Locked Option on Seat
The seat spring (on standard base models only) also has two locked, (non-dynamic) positions, each providing 15˚ of adjustment using the tilt-in-space lever.
For extra seat recline (on standard base models only):
If the seat has a gas spring (located under the seat) it will also have the two locked (non-dynamic) positions allowing an extra 15˚ of recline from the tilt-in-space. To unlock the seat spring, rotate the twist-lock collar under the seat counter-clockwise. Turn it clock-wise to lock it and then use the tilt-in-space lever to make final adjustments.
Tilt–in–Space
Tilt–in–Space is a built–in feature on both chair bases. Tilt–in–space moves the entire seat and backrest from an active, forward, functional sitting position to a reclined, rest position and vice versa, maintaining the seat to back angle throughout. The Hi/Lo base offers backward tilt–in–space to 25° and forward tilt–in–space to 15°. The Standard base offers backward tilt–in–space to 15° and forward tilt–in–space to 15°.
(Note: with the optional seat spring on the Standard base, the tilt angle range available is altered.)
To adjust the tilt–in–space angle, place one hand on a push handle or on top of backrest. With other hand simultaneously squeeze tilt lever and safety lock (Figure 9). There is an angle indicator on the side of the chair for consistent positioning and documentation purposes.
Backrest Adjust / Backrest Filler Pad
Backrest angle and height adjust easily with one–hand levers, while the client is in the chair.
Backrest angle is adjusted by squeezing white backrest angle lever and moving backrest forward or backward. (Figure 10) On both chair styles, the backrest adjusts 5° forward and 20° back. There is an angle indicator for consistent positioning and documentation purposes.
(Note: with the optional backrest spring, the backrest tilt angle range available is altered. See Locked Options on Backrest.)
Backrest height is adjusted by depressing the backrest height lever and raising or lowering the backrest. (Figure 11) The height from the top of the backrest to the seat offers six positions, ranging from 15.5 inches up to 19 inches.
Backrest filler pad can be used for additional lower back support when chair backrest is in the top 3 available positions, which results in an open space between bottom edge of the backrest and the seat. The backrest filler pad snaps easily into place on a snap stud centered at rear bottom edge of backrest.
Pads
Pads for backrest and for seat are snapped easily onto studs on edges of the backrest and seat. Color options are red, tan, and blue.
Posture Support: Lumbar and Seat Support Kit
Lumbar and seat support kit provides extra postural support. The lumbar piece is placed behind backrest pad for additional low back support, and the seat support is placed under the seat pad towards the front of the seat to help prevent user from sliding forward. (Figure 12)
To install custom lumbar and seat support, remove seat and backrest pads, then cut or trim support padding and affix to seat or backrest with hook and loop strips. Replace seat and backrest pads when finished.
Seat Depth
Seat Depth is adjusted by using two fingers to pull white handle located below seat. (Figure 13) Move seat forward or backward to desired position and release handle. Make sure seat clicks into place. Seat depth range is from 11 inches to 16 inches.
Push Handles
Push Handles provide an easy and ergonomic way for caregiver to maneuver chair and transport user. (Figure 14) There is a left and right push handle, so each handle will only fit into correct side of chair. To install push handle, depress snap button at bottom of handle and insert it into one of the extrusions at rear of backrest. To adjust push handle height, depress snap button (you may have to temporarily move other prompts out of the way) and move handle up and down until desired height is reached, then click into place.
Accessories
Accessories are used to optimize position for participation and function. By using only those accessories needed to support an active functional sitting position, the seated client can freely use head and upper extremities to accomplish a task.
For example, to achieve active, functional sitting, you may start with a well–stabilized pelvis in a slightly anterior seat tilt, and offer a surface such as forearm prompts or tray for the client’s arms to assist postural control. With this support, the accessories for the lower extremities and upper body can be minimized where possible. Since active, functional sitting requires co–activation of core postural muscles during tasks, this position will result in fatigue. Be ready to offer rest periods as needed with the tilt–in–space feature of the chair.
Head, Trunk, and Upper Extremity Accessories
Headrests
Flat headrest and Contoured headrest options are available.
To install and adjust height of headrest, depress white button at top back of chair. Insert metal headrest bar, then raise or lower it to desired position, clicking it into place. Headrest height above seat level ranges from 17.5 to 24.5 inches.
Depth and angle of headrest can be adjusted as well. Loosen both black knobs, move headrest to desired position and re–tighten both knobs securely. (Figure 15)
Trunk Supports
Lateral supports provide comfortable side–to–side support for user, and are fully adjustable in height, width, and angle. Each lateral adjusts independently of the other. To install and/or adjust the lateral support, loosen the black knob, insert piece into the extrusion behind backrest, and adjust the height, angle, and width of lateral to fit the user. (Figure 16) When desired adjustment is reached, tighten knob firmly. Lateral supports can be purchased either with or without chest strap.
Chest strap with lateral supports can provide anterior support. (Figure 17) To use the chest strap designed for use with lateral supports, thread loop at either end of chest strap over the knob and key assembly of lateral supports with the chest strap buckle faced outwards. Loops can be threaded so that chest strap encompasses lateral supports, or so that it straps on the inside of lateral supports.
Wide chest strap is a stand–alone chest strap. It is another option for chest strap that is not used with the lateral supports. (Figure 18) To install and to adjust the wide chest strap, loosen black knobs at both ends of strap and insert the keys into the extrusions behind backrest. Slide knobs up and down until desired height is achieved, then tighten knobs firmly.
Butterfly harness provides anterior support while allowing freedom of movement. (Figure 19) To install butterfly harness insert L–shaped metal clips at the ends of lower harness straps into clip slots at either side of seat. To insert or remove butterfly harness, use pen or key to depress small white button and pull harness upwards to disengage clip. Butterfly harness has four buckles to completely detach harness pad. To use butterfly harness, transfer client into chair, then place harness pad on user’s chest. Secure all four buckles and adjust straps as necessary.
The butterfly harness can be clipped into either set of small slots at sides of chair. Use other set of clip slots for the seatbelt or pelvic harness. ALWAYS use a seatbelt or pelvic harness. Absence of a seatbelt or pelvic harness may result in falls and may pose a strangulation hazard to user when a chest strap, butterfly harness or tray is in use.
Arm Supports, Tray and Handhold
Armrests come in left and right pairs and insert into large slots at either side of the seat. (Figure 20) Depress the white button just below the armrest slot, insert armrest, move it up or down to required height, and click into place. To remove, such as for transfer, depress the white button and pull upwards on armrest.
Armrests can be set at a range of forward and backward angles, from horizontal up to 60° (up or down). To set angle of armrest, lift white tab below outer edge of armrest and rotate to desired angle.
When the tray is in use, the armrest adjustment will set the angle of the tray. (Note: Flat edge of armrests should be forward.)
Forearm prompts adjust fully to facilitate trunk and head control while sitting. (Figure 21) Forearm prompts come in left and right pairs. The support bar is inserted into the large slots at either side of the seat, using the same white button and the same slot as for the armrests.
Forearm prompts are very versatile and adjustable. They can be used for both arms or for one arm at a time. The forearm prompts are attached to the support bar using a clamp and post system and can be mounted on the inside or outside of the bar, at the desired forward–back distance from the client.
Insert the post into the clamp to the desired height. The forearm prompts can be mounted to the post in several positions to achieve the best position for the user. Forearm prompts are identical to arm prompts used on the Rifton Pacer. Adjust the forearm prompts to the best position for user’s comfort and function.
Tray provides a firm surface for seated activities such as eating and art, and adjusts in height, angle and depth. A softly–rounded rim contains spills. Tray only attaches to armrests, not forearm prompts. To install tray, set both armrests to same height and angle. Pull black handle on bottom front of tray and slide tray onto armrests. To adjust tray depth, pull black handle to slide tray forward or back and click into place. Adjust tray height and angle by adjusting armrest height and angle with tray attached.
Handhold can be attached anywhere along rim of tray to provide additional support and security. To install and adjust handhold, loosen large oval knob on handhold, slide it along tray until desired position is reached, then tighten knob securely.
Pelvis and Lower Extremity Accessories
Pelvic harness is an alternative to the more typical seatbelt. It gives a very stable base for developing sitting postural control. The pelvic harness firmly positions the user?s pelvis by securing hips and upper thighs, without placing pressure on the abdomen.
To install pelvic harness, place it on the seat with wide ends towards back of seat. The short straps at the back corners of harness have L–shaped metal clips — these insert into slots at either side of seat. The buckles at the front narrow ends of the harness will be pulled around user’s upper thighs and fastened at rear of harness; then the straps are adjusted in length for best fit. (Figures 22 & 23)
Pelvic harness is inserted and removed by using a pen or key to depress the small white button just below the clip slot. There are two clip slot options at side of chair. Consider seat depth required for user and select clip slot that allows best use of pelvic harness.
Seatbelt comes automatically with every chair. ALWAYS use a seatbelt or pelvic harness. Absence of a seatbelt or pelvic harness may result in falls and may pose a strangulation hazard to user when a chest strap, butterfly harness or tray is in use. Seatbelt can be clipped into either set of small slots at sides of chair. Seatbelt is inserted and removed by using a pen or key to depress the small white button just below the clip slot.
Adduction: Hip Guides / Thigh Belt / Adductors
Hip guides provide additional lateral support to user’s hips and can be adjusted for seat width. Seat width without hip guides is 14 inches wide. With the hip guides, seat width ranges from 8.5 to 11.5 inches (with both hip guides in use.) Hip guides are clipped to arm supports and can therefore be easily removed along with arm supports for transfers. Hip guides can be used with both armrests and forearm prompts.
To install hip guides, remove arm supports and thread the hip guides onto the arm support posts, then place arm supports back into slots at sides of chair. To adjust width between the hip guides, depress the white button and move either hip guide in and out, clicking it into place at the desired setting. (Figure 24)
Thigh belt provides additional support and security for user’s thighs, and helps adduct user’s knees. (Figure 25) To install thigh belt, unsnap and lift up front of seat pad to access the H–slot under the seat pad. The metal slide will be on top and (by pinching belt and pushing it through H–slot) the belt looping will be under the H–slot to hold the position of thigh belt, under the seat pad. The thigh belt can then be buckled across the client’s lap. To adjust thigh belt length, pull adjuster straps that are threaded through either side of center buckle. The thigh belt will move forward with the seat, if the seat depth is adjusted.
 |
Adductors can be used to limit lateral movement of user’s knees and provide a comfortable lateral boundary. To install adductors, depress the white buttons located below front corners of seat and insert metal posts into slots located on sides of seat at front corners, with adductor pads towards seat. To remove adductors, depress adductor buttons and pull adductors out of their slots. (Figure 26)
Abduction: Abductor / Leg Prompts
Abductor can be used to keep user’s knees comfortably apart. Before installing abductor remove leg prompts, if present. To install abductor, reach below slot and depress white abductor button. Insert abductor post into slot centered directly beneath front of seat. Adjust depth of abductor to seat, by depressing white abductor button and pulling abductor forward or back; release button when desired setting is achieved.
Leg prompts can be used in place of abductor, and provide both abduction and adduction. Before installing leg prompts, remove abductor, if present. To install leg prompts, insert leg prompt post into slot centered directly beneath front of seat. Adjust depth of leg prompts to seat, by depressing leg prompt button and pulling leg prompts forward or back. To adjust width of leg prompts, depress white width buttons located on plastic housing behind leg prompt straps. Move leg prompts closer or farther apart, then release buttons to click into place. Secure user’s legs in place with leg prompt straps.
Footboard and Foot Placement: Ankle Straps / Sandals & Wedges
Footboard is optional with the Standard base (Figure 27), and can be removed with a wrench. The footboard is a required component of the Hi/Lo base and will come automatically with each Hi/Lo.
Footboard height may need to be adjusted for various users. The footboard–to–seat height ranges from 12 – 16.5 inches. The footboard can support weight of user during transfers, and/or can be swung beneath seat for transfers. The footboard serves as a base for ankle straps, sandals, and wedges.
Ankle straps are used on the footboard to secure user’s feet while providing a bounded range of movement (see Figure 28). To install ankle strap, place black plastic clip at end of strap beneath T–slot at rear of footrest and pull strap firmly upwards through the slot to secure clip in T–slot. Adjust straps to fit user’s needs. (Note: Sandals cannot be used together with ankle straps.)
Sandals can be used with footboard to provide more secure positioning of user’s feet. Sandal bases come in a left and right pair. To install, place sandal base on footboard and position it above one of the pairs of screw threads embedded in footboard. Use black knobs provided to secure sandal base to footboard. Begin by tightening knobs only halfway, slide sandal base back and forth until desired position is reached, then tighten knobs firmly. Latch sandals onto sandal bases using white levers.
Wedges can be added beneath sandals for a custom fit of sandal tilt and/or height. To install wedge, pull back white lever at side of sandal to free it from sandal base. Wedges may be used either way around and can be stacked. Secure user?s feet using sandal straps.
Progression of Functional Sitting: Accessory Support Reduction
Lack of head and trunk control is a primary reason that individuals with physical challenges are unable to sit independently. Leaning back even slightly as in the typical wheelchair or passively–positioned seated posture actually prevents the possibility of improving and developing head and trunk control.
Functional sitting requires learning how to maintain the shoulder girdle over the stabilized pelvic girdle, and to bring the upper body back to this balanced position after moving out of midline to complete a task. Use of forearm prompts can provide upper extremity weight–bearing assist and support, with which a client can then learn head and trunk control.
The active or functional sitting posture can viewed as similar to the preparatory posture in the sit–to–stand transfer. The pelvis tilts anteriorly, the shoulder girdle is placed in front of the pelvis, and this position transfers the body’s weight forward over the legs. Stabilized in this position, the core muscles are challenged and the shoulder girdle can be mobile to accomplish tasks.
Functional sitting for clients with physical disabilities requires co–activation of core muscles that may be quite weak and that fatigue with use. Early learners need many opportunities to sit actively for short periods of time, for dynamic sitting practice that is incorporated into meaningful activities. The tilt–in–space feature allows rest periods in between activity–based learning opportunities.
Each person is unique in terms of fluctuations of tone, presence of spasticity, and the strength and motor control of their trunk and extremities. However, the following example shows consideration of supports and removal of supports in one sample instance.
Initially, the client needs a well–stabilized pelvis (pelvic harness or seatbelt). Consider slight anterior tilt of the seat, plus support at the trunk (example: laterals with chest strap and forearm prompts) and a headrest. The client needs lower extremity support as well (example: leg prompts and sandals.)
As leg control improves, leg prompts can be removed. Next, the headrest can be removed. The chest support can be loosened, lowered, and finally be removed as well, leaving the pelvic harness and use of forearm prompts in place. Note: As peripheral trunk support is lessened, the individual may still require some foot placement or control (such as the ankle straps) to help prevent them from sliding into a posterior tilt or sacral sitting, until improved control allows foot support to be fully removed.
Depending on the client’s progression of pelvic stability and/or trunk stabilizing abilities, either the pelvic stabilizer or the forearm prompts will be the next supports removed. By using just one or the other of the forearm prompts at different times, (and/or alternating use with the stand–alone chest strap for example) the core stabilization of the trunk can further improve. (Positioning the chair near a table and using a Rifton Anchor is another way to offer this later stage trunk stabilization opportunity.)
As trunk control and independent sitting improves, the final support to be removed may be the seatbelt. Transitioning to a regular classroom chair or bench is another way to both challenge practice and ultimately to generalize the client’s active sitting skill.
Incorporating sit–to–stand practice into classroom transitions is another way to progress head and trunk control. By slightly elevating the seat and giving it a forward–tilt, the sit–to–stand transfer practice can be made easier for the early learner. Close attention to the seat–to–floor height, perhaps removing footrest or swinging it back under the seat, can assure on–going practice opportunity of sit–to–stand transfers, with the client’s feet having direct access to the floor. The chair’s forearm prompt or armrest can easily be removed during transfers as needed.
Back to Top